Form Endpoints allows you using Easy Forms as a form backend platform to handle your forms on your websites and mobile apps. You can set up a form and start collecting submissions to your form within minutes.
Collecting form submissions
As a starting point, you can download the HTML code of your form. Then, you can adapt it to the needs of your website or mobile application.
To collect form submissions, follow the next steps:
- In the navigation bar, click “Forms“
- Click on the form name you want to share
- Click on the “Publish and Share” button (the green arrow icon)
- Click on the “Download the HTML” menu.
- Finally, upload the HTML file to your host and submit it.
See the example:
See the Pen
Easy Forms: External Form with Regular Request by Baluart (@baluart)
on CodePen.
If everything is OK, you will be redirected to a Confirmation page. You can set the Confirmation Page as always (Forms -> Actions -> Settings -> Confirmation Settings -> Redirection to Another Page).
If a system error or validation error occurs, you will be redirected back to your form page. In the URL you will see the name of the field and associated error message so that you can show them to your users. If, for some reason, the app can’t detect the referrer page, an error page will be displayed by default.

Notes:
- To receive your submissions correctly, include the
accept-charset="UTF-8"attribute to your form tag.
Uploading Files
While collecting submissions on Easy Forms, you might want to collect files too. Easy Forms supports file uploads to your form. The size limit for your files is limited by your PHP settings (php.ini). However, you can use Easy Forms to validate File Sizes and File Types as always.
To send files don’t forget to add enctype=multipart/form-data" into the Form tag.
Note: At the moment, Easy Forms does not support HTML5 multiple file upload syntax. So, if you want to receive multiple files, you will need to add multiple File fields.
Sending submissions with AJAX
With Easy Forms, you can send your form data with AJAX.
Just take into account that your request must have the following header:
"X-Requested-With": "XMLHttpRequest"
If you want to get your responses in JSON format, you need to add dataType: "json", it sets Accept Http Header to application/json. Also, if you want to get your responses in XML format, you need to add dataType: "xml", it sets Accept Http Header to application/xml.
As a summary, we can send the response in 3 different formats:
- “Accept”: “text/html”
- “Accept”: “application/json”
- “Accept”: “application/xml”
You will need to set up any of these data types in your header request. But, for Ajax request, we suggest using JSON.
See our example:
See the Pen
Easy Forms: External Form with Ajax Request by Baluart (@baluart)
on CodePen.
In this example, we are using the following javascript code:
<script src="https://cdnjs.cloudflare.com/ajax/libs/jquery/3.4.0/jquery.min.js"></script>
<script>
$("#form-app").submit(function(e){
  e.preventDefault();
  var action = $(this).attr("action");
  $.ajax({
    type: "POST",
    url: action,
    crossDomain: true,
    data: new FormData(this),
    dataType: "json",
    contentType: "multipart/form-data",
    processData: false,
    contentType: false,
    headers: {
      "X-Requested-With": "XMLHttpRequest",
      "Accept": "application/json"
    }
  }).done(function(res) {
    if (res.success) {
      $('.alert-success').show();
    }
  }).fail(function() {
    alert('An error occurred please try again later.')
  });
});
</script>
Uploading files with AJAX
Easy Forms can accept files with AJAX requests, however, some browsers like Internet Explorer don’t support this feature.
See the following code:
<script src="https://cdnjs.cloudflare.com/ajax/libs/jquery/3.4.0/jquery.min.js"></script>
<script>
$("#form-app").submit(function(e){
  e.preventDefault();
  var action = $(this).attr("action");
  $.ajax({
    type: "POST",
    url: action,
    crossDomain: true,
    data: new FormData(this),
    dataType: "json",
    contentType: "multipart/form-data",
    processData: false,
    contentType: false,
    headers: {
      "X-Requested-With": "XMLHttpRequest",
      "Accept": "application/json"
    }
  }).done(function(res) {
    if (res.success) {
      $('.alert-success').show();
    }
  }).fail(function() {
    alert('An error occurred please try again later.')
  });
});
</script>
Note: You need to add enctype="multipart/formdata" like with the regular form.
<form id="form-app" action="YOUR_ENDPOINT_URL" method="post" enctype="multipart/form-data" accept-charset="UTF-8">
    <label class="control-label" for="filename">Picture</label>
    <input type="file" id="filename" name="filename" data-alias="filename" accept=".gif, .jpg, .png">
    <input value="Submit" type="submit">
</form>
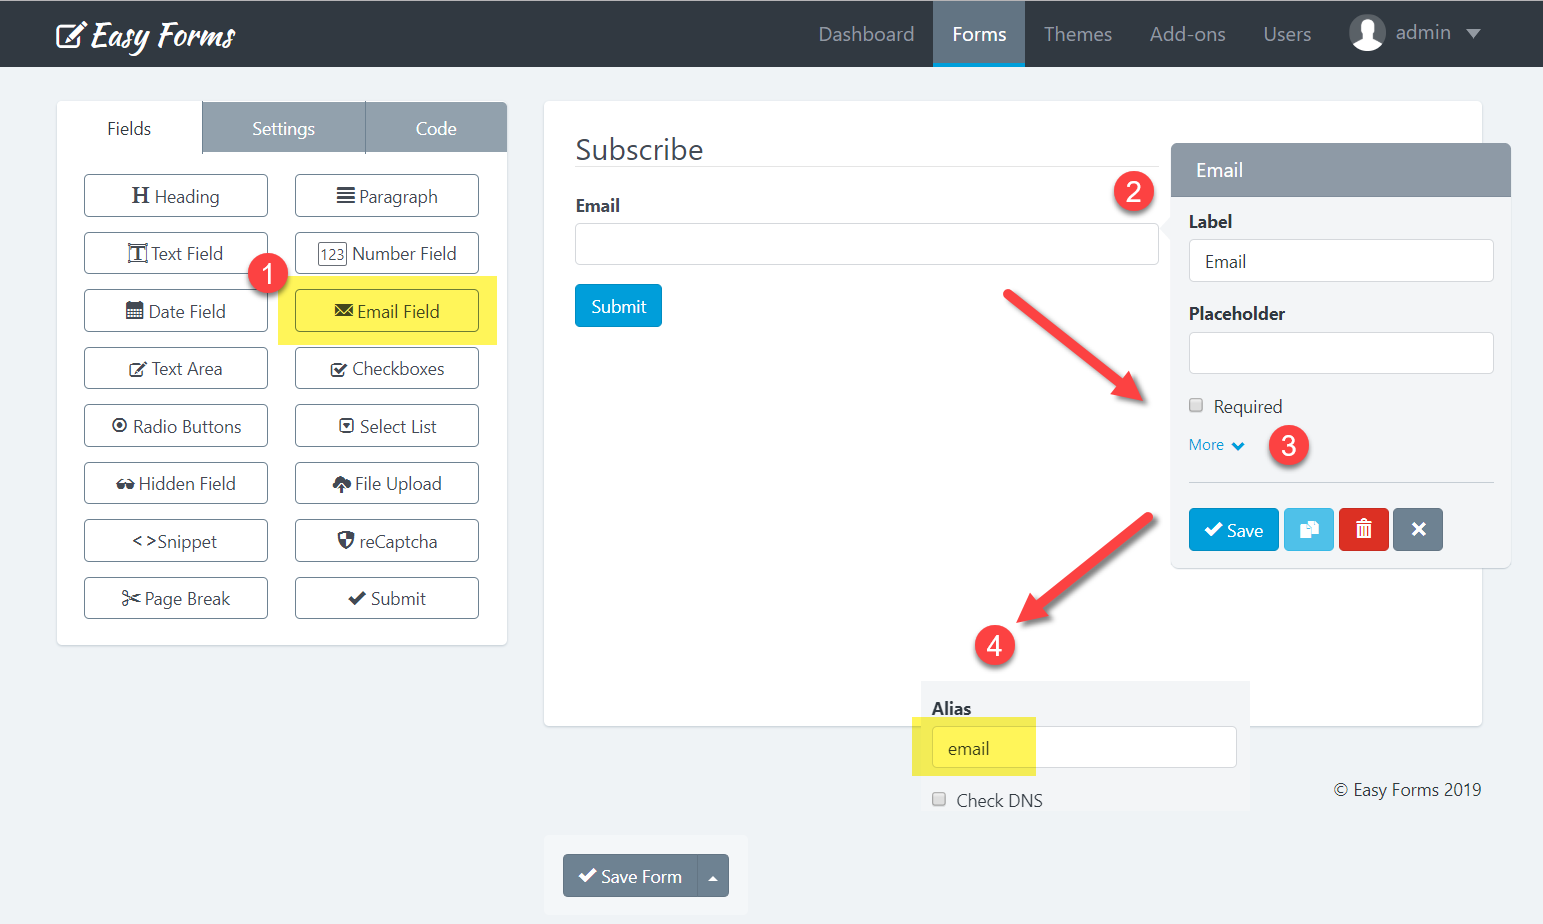
Custom Field Names
If you want to replace the “name” attribute of each field, you need to set it as a Field Alias in the Form Builder. This way, your data will be saved and shown correctly on the “Submission Details” page.
By default, our application generates field names in a required format to identify its type in the system (text_123, email_123, etc.). With an endpoint you can customize the field name by the name you want, just don’t forget to add the same name as Field Alias in the Form Builder.
For example. if we want to submit an input with the name attribute “email”.
<form id="form-app" action="YOUR_ENDPOINT_URL" method="post" accept-charset="UTF-8">
    <input name="email" type="email" id="email">
    <input value="Submit" type="submit">
</form>
We need to add “email” as Field alias.
Spam Filtering
We use the Honeypot technique for spam filtering. If you want to get this protection in your form, just add a field with the name attribute: “_email“. For example:
<div style="display:none">
    <label for="_email">Excuse me, but leave this field in blank</label>
    <input type="text" id="_email" name="_email">
</div>
If the ‘_email‘ field is filled, Easy Forms will detect it and return an Error 404 Not Found.
reCAPTCHA validation
To use Google reCAPTCHA in your form, follow the next steps:
- Go to Site Settings and enter reCAPTCHA API Keys
- Go to the Form Builder and add the reCAPTCHA field to your Form
- In your external HTML page, load the javascript file provided by Google reCAPTCHA:
<script src="https://www.google.com/recaptcha/api.js"></script>
- Add the hidden field where the reCAPTCHA field will be displayed:
<div class="g-recaptcha" data-sitekey="YOUR reCAPTCHA SITE KEY"></div>
That’s all! But, don’t forget to allow access to display reCAPTCHA on your domains.
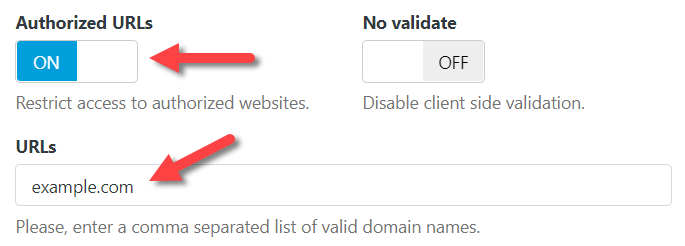
CORS and domain restriction
You can restrict the domains from where you can receive form submissions. Just go to Forms -> Actions -> Settings -> Authorized URLs and enter comma-separated domains from where you want to receive form requests.
HTML5 validation
Our forms support HTML5 validation by default, however, you can disable this feature to implement your custom client-side validation, just add the ‘novalidate’ attribute to the ‘form’ tag. Eg.
<form id="form-app" action="YOUR_ENDPOINT_URL" method="post" enctype="multipart/form-data" accept-charset="UTF-8" novalidate>